You can use nmap to ping scan IP ranges , by following commands :
nmap -sP 192.168.1.0/24
or
nmap -sP 192.168.1.1-254
You can use nmap to ping scan IP ranges , by following commands :
nmap -sP 192.168.1.0/24
or
nmap -sP 192.168.1.1-254
mod_evasive is a module for Apache (both 1.3 and 2.0) giving Apache the ability to detect and fend off request-based DoS/DDoS attacks and brute-force attacks conserving your system resources and bandwidth. This tool can be configured to report abusers and even talk to network gear (such as a firewall or ipchains).
in this article we explain how to install mod_evasive on Apache 2 :
wget http://www.zdziarski.com/blog/wp-content/uploads/2010/02/mod_evasive_1.10.1.tar.gz
tar zxvf mod_evasive_1.10.1.tar.gz
cd mod_evasive
/usr/local/apache/bin/apxs -cia mod_evasive20.c
next step is to add the required configuration to the Apache config file , we can add this directly to the end of httpd.conf file but the problem is that if we do this , the httpd.conf will be overwritten by easyapache so we will use include files to add our config.
login into your WHM panel , and follow the following menu items :
Main >> Service Configuration >> Apache Configuration >> Include Editor
on the Pre Main Include section , choose All Versions from drop down menu and add the following config into it :
<IfModule mod_evasive20.c>
DOSHashTableSize 3097
DOSPageCount 5
DOSSiteCount 50
DOSPageInterval 1
DOSSiteInterval 1
DOSBlockingPeriod 600
</IfModule>
then click on update and restart Apache server.
netstat -plan|grep :80|awk {'print $5'}|cut -d: -f 1|sort|uniq -c|sort -nk 1
If you’re not using Active Directory, your “Local Security Policy” dictates things like password complexity rules, account lockouts, and password expiration. To turn off password expiration:
1) Login as Administrator or a user with Administrator rights
2) Launch “Local Security Policy”: Start > Administrative Tools > Local Security Policy
3) Expand “Account Policies”
4) Select Password Policy
5) Set Maximum Password age to “0”
Source : Ryan’s Tech Notes
As it is explained everywhere on the web , the general solution to prevent mysql injection attacks in php is to use mysql_real_escape_string function , there are many guides on how to use it in conjunction with sprintf to escape dangerous characters before executing a mysql query, but I found a very innovative solution in a comment on php.net website , it recommends to escape all variables sent by user by get or post method in the beginning of every page which executes mysql queries :
first make sure magic_quotes_gpc is turned off on your php configuration , it can be checked on php info page.
this step makes sure your variables are not escaped twice.
This article explains how to disable magic quotes : Disabling Magic Quotes Guide
put the following code in the beginning of every page executing mysql queries :
	include ('mysql_connect.php');

	//This stops SQL Injection in POST vars
	foreach ($_POST as $key => $value) {
		$_POST[$key] = mysql_real_escape_string($value);
	}

	//This stops SQL Injection in GET vars
	foreach ($_GET as $key => $value) {
		$_GET[$key] = mysql_real_escape_string($value);
	}
mysql_real_escape_string needs you to be connected to your mysql database when you call it , so I have placed include (‘mysql_connect.php’); in the beginning of script , you can replace it with your own mysql connect commands.
Install Apache radius module :
apt-get install libapache2-mod-auth-radius
enable radius module for Apache :
a2enmod auth_radius
open /etc/apache2/apache2.conf and add the following lines to end of file :
AddRadiusAuth IP_OF_RADIUS_SERVER:PORT SECRET 5
AddRadiusCookieValid 60
go to /var/www folder or the folder which you want to protect and create a .htaccess file inside it containing following lines :
AuthType Basic
AuthName "AdminseHow Radius Authentication"
AuthBasicAuthoritative Off
AuthBasicProvider radius
AuthRadiusAuthoritative on
AuthRadiusActive On
Require valid-user
restart Apache :
/etc/init.d/apache2 restart
for more info regarding the configuration options , you can read the following link :
http://freeradius.org/mod_auth_radius/
In order to flush all iptables rules , Run the following commands :
iptables -F
iptables -X
iptables -t nat -F
iptables -t nat -X
iptables -t mangle -F
iptables -t mangle -X
iptables -P INPUT ACCEPT
iptables -P FORWARD ACCEPT
iptables -P OUTPUT ACCEPT
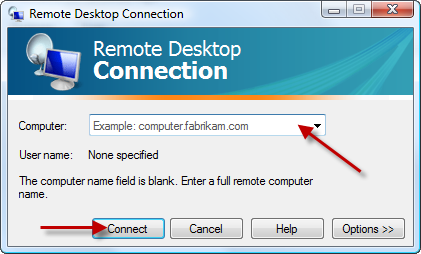
In order to connect to a windows VPS remotely , you need to use a software named “Remote Desktop Connection” which is bundled with all versions of windows.
under windows XP it is located under : All Programs –> Accessories –> Communications
under windows Vista it is located under : All Programs –> Accessories
after running this software you will see the following window , enter the IP or host name of your VPS into the computer filed and click on Connect.
after a few seconds a new windows will be opened and you will be asked for the username and password , enter the username and password which is provided by your windows VPS provider. usually the username is Administrator.
if you enter the login details successfully , the desktop of windows VPS will be shown to you.
After you are logged into VPS , follow the below instructions :
Press CTRL+ALT+END buttons simultaneously , the following menu will appear :

Click on Change Password :

Fill the fields and click on OK.
Done 🙂
one of the problems I had on one of my cPanel servers was that some people were using download managers to download files from server , so hundreds of connections were being ESTABLISHED to Apache and it was becoming like a dos attack and causing Apache to become non responsive.
so here is what I did to limit connections per IP in a cPanel hosting server :
there is an Apache module named mod_limitipconn which will take care of it for us.
first download the latest version of mod_limitipconn from this site : http://dominia.org/djao/limitipconn2.html
decompress and install it.
at current time the latest version is 0.23.
wget http://dominia.org/djao/limit/mod_limitipconn-0.23.tar.bz2
tar jxvf mod_limitipconn-0.23.tar.bz2
cd mod_limitipconn-0.23
/usr/local/apache/bin/apxs -cia mod_limitipconn.c
next step is to add the required configuration to the Apache config file , we can add this directly to the end of httpd.conf file but the problem is that if we do this , the httpd.conf will be overwritten by easyapache so we will use include files to add our config.
login into your WHM panel , and follow the following menu items :
Main >> Service Configuration >> Apache Configuration >> Include Editor
on the Post VirtualHost Include section , choose All Versions from drop down menu and add the following config into it :
<IfModule mod_limitipconn.c>
<Location />
MaxConnPerIP 10
NoIPLimit images/*
</Location>
</IfModule>
then click on update and restart Apache server.
now We are all set 🙂
A very effective way for backing up your data on a Linux server is to set a cron job on your box to mail your data to your GMail account. GMail servers are very reliable and give you a huge amount of space for free. so they are pretty suitable for backing up sensitive data.
In order to accomplish this , first create a directory named “backup” in the root directory of your box :
cd / && mkdir backup
then you need to create a script to do the backup and mail it for you.
nano /usr/bin/backup
copy and paste the following into the file :
cd /backup
rm -rf /backup/*
cp LIST_OF_FILES .
tar jcf backup.tar.bz2 *
echo | mutt -a backup.tar.bz2 -s "my daily backup" -- adminsehow@gmail.com
you have to change LIST_OF_FILES string to the list of the files you want to be backed up separated by space , and change adminsehow@gmail.com to your own gmail account.
as you can see in the script we are compressing the data files to make them as small as possible.
also we are using “mutt” to send emails so you need to install it , in Debian you can install it by following command :
apt-get install mutt
make the script executable :
chmod +x /usr/bin/backup
lastly you need to set a cron job , so open the cron file by following command :
crontab -e
and copy and paste the following command into it :
0 0 * * * /usr/bin/backup
it will run your backup script once daily 🙂
also don’t forget you need to have a working smtp server on your Linux box.
Powered by WordPress