Admins eHow SysAdmin Tips & Tricks

September 14, 2011

An analysis of recent security breach to DigiNotar and Man-In-The-Middle attack to Iranian users

Filed under: General,Security — Tags: , , , , , , , — admin @ 9:23 am

As I have received several requests from Iranian readers of my blog, I have done some analysis on recent DigiNotar security breach and MITM attack to Iranian users.
This analysis is based on Fox-IT interim report of breach. You can download the complete report in PDF Format from the following link :
http://www.adminsehow.com/wp-content/uploads/2011/09/rapport-fox-it-operation-black-tulip-v1-0.pdf

What is MITM attack and how to prevent it ?
MITM stands for Man-In-The-Middle. it simply means someone stands between you and destination and intercepts or modifies your communication. it is quite easy when communication is not encrypted.
SSL protocol is originally invented to address this issue. The idea is that a trusted Authority (CA) authenticates the identity of destination and by using some cryptography protocols your connection to authentic destination becomes encrypted and impossible to intercept or modify.
It has been shown that the cryptography methods like AES or RC4 which are employed to encrypt the data are quite effective and very hard to crack. so the easier solution is to attack the base of trust model, the trusted authorities (CA). In this kind of attacks, hackers break into CA systems and forge valid certificates for themselves so they can impersonate themselves as authentic destinations and intercept the data. this kind of attack is used in both recent incidents, Commodo and DigiNotar.
Although the protocol is almost safe itself, unfortunately many of these CAs are vulnerable themselves making the whole process vulnerable.
The FOX-IT report indicates the DigiNotar systems were using Windows (Which is vulnerable in nature) and passwords has been crackable through brute-force attack. (More on this later)

To understand it better, I have created a diagram of recent MITM attack to Iranian users with the goal of intercepting communications between them and Google. the attackers have been able to gain access to Google accounts of users through this attack :

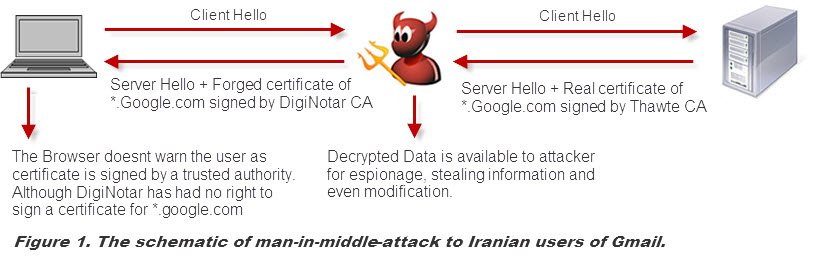
This diagram is self-explanatory. The attacker in middle impersonates itself as Google and establishes a secure connection to the user which is signed by DigiNotar CA. Although the connection is still secure, but users have a secure connection to the attacker, not real Google. so attacker has access to all information sent by user, including username, passwords, cookies and etc.
(more…)

July 14, 2009

Limit Connections per IP using mod_limitipconn on cPanel

Filed under: Apache,CentOS,cPanel,General,Security — Tags: , , , , , , — admin @ 9:41 am

one of the problems I had on one of my cPanel servers was that some people were using download managers to download files from server , so hundreds of connections were being ESTABLISHED to Apache and it was becoming like a dos attack and causing Apache to become non responsive.
so here is what I did to limit connections per IP in a cPanel hosting server :
there is an Apache module named mod_limitipconn which will take care of it for us.
first download the latest version of mod_limitipconn from this site : http://dominia.org/djao/limitipconn2.html
decompress and install it.
at current time the latest version is 0.23.

wget http://dominia.org/djao/limit/mod_limitipconn-0.23.tar.bz2
tar jxvf mod_limitipconn-0.23.tar.bz2
cd mod_limitipconn-0.23
/usr/local/apache/bin/apxs -cia mod_limitipconn.c

next step is to add the required configuration to the Apache config file , we can add this directly to the end of httpd.conf file but the problem is that if we do this , the httpd.conf will be overwritten by easyapache so we will use include files to add our config.
login into your WHM panel , and follow the following menu items :
Main >> Service Configuration >> Apache Configuration >> Include Editor
on the Post VirtualHost Include section , choose All Versions from drop down menu and add the following config into it :

<IfModule mod_limitipconn.c>
<Location />
MaxConnPerIP 10
NoIPLimit images/*
</Location>
</IfModule>

then click on update and restart Apache server.
now We are all set 🙂

May 16, 2009

Guide to secure the server using DenyHosts

Filed under: CentOS,Debian,General,Security — Tags: , , , , — admin @ 9:20 am

One of the greatest tools I have found to secure the server from brute force attacks and keep your server out of the reach of hackers is DenyHosts.
What DenyHosts does is very simple , but very effective , it processes auth.log ( in Debian based distros ) or secure.log ( in Redhat based distros ) and finds unsuccessful login attempts through ssh and blocks the attacker through /etc/hosts.deny file.
also it has a central server which can synchronize all DenyHosts instances around the world , so if there is an attacker detected in US , it will be blocked in all of the world very fast ! but this option needs to be enabled in config file.
DenyHosts is an open source project and is available to download at sourceforge : http://denyhosts.sourceforge.net

As my favorite distro is Debian , I guide you how to install and use it on Debian. but steps are almost the same on CentOs.
DenyHosts is available through Debian repos so you can simply install it by :

apt-get install denyhosts

then you need to configure it , configuration file is located at /etc/denyhosts.conf
I suggest you to read the whole file and understand it , it worth’s the time. but in case you need a good working configuration, you can use mine :

SECURE_LOG = /var/log/auth.log
HOSTS_DENY = /etc/hosts.deny
PURGE_DENY = 1w
PURGE_THRESHOLD = 2
BLOCK_SERVICE  = sshd
DENY_THRESHOLD_INVALID = 5
DENY_THRESHOLD_VALID = 10
DENY_THRESHOLD_ROOT = 1
DENY_THRESHOLD_RESTRICTED = 1
WORK_DIR = /var/lib/denyhosts
SUSPICIOUS_LOGIN_REPORT_ALLOWED_HOSTS=YES
HOSTNAME_LOOKUP=YES
LOCK_FILE = /var/run/denyhosts.pid
ADMIN_EMAIL = youremail@domain.com
SMTP_HOST = localhost
SMTP_PORT = 25
SMTP_FROM = DenyHosts <nobody@domain.com>
SMTP_SUBJECT = DenyHosts Report
AGE_RESET_VALID=5d
AGE_RESET_ROOT=25d
AGE_RESET_RESTRICTED=25d
AGE_RESET_INVALID=10d
DAEMON_LOG = /var/log/denyhosts
DAEMON_SLEEP = 30s
DAEMON_PURGE = 1h
SYNC_SERVER = http://xmlrpc.denyhosts.net:9911
SYNC_INTERVAL = 1h
SYNC_UPLOAD = yes
SYNC_DOWNLOAD = yes
SYNC_DOWNLOAD_THRESHOLD = 3
SYNC_DOWNLOAD_RESILIENCY = 5h

Don’t Forget to set ADMIN_EMAIL and SMTP_FROM to your own emails.
One of the important steps that you should do is to add your own IP address to white list so it doesn’t get blocked.
to do this , open /var/lib/denyhosts/allowed-hosts file and enter your own IP in it.
if you have forgotten to do this and now you are blocked from server , you need to connect to server from another IP address and do the following steps :

1.Stop DenyHosts :

/etc/init.d/denyhosts stop

2.Remove the IP address from /etc/hosts.deny
3.Also you need to remove your IP address from any file located in /var/lib/denyhosts , first look which files contain your IP :

grep Your_IP *

The remove the IP from files using your favorite editor or method 😉

Edit : I have found a great solution to delete your IP from all files all at once.

sed -i '/Your IP/d' *

4.Consider adding the IP address to /var/lib/allowed-hosts
5.Start DenyHosts

Powered by WordPress