Admins eHow SysAdmin Tips & Tricks

April 30, 2010

Connect to PPTP VPN from Linux only by one command

Filed under: CentOS,Debian,General — Tags: , , , , , , , , , — admin @ 1:03 pm

I’ve used this method to connect to a windows PPTP VPN server on PCLinuxOS 2010 , but I am sure it will work on other ditros too.
First make sure sure pptp-linux and ppp packages are installed on your client PC.
you may install them by yum or apt-get or package manager of your linux.
then use the following command to connect to VPN.

pppd pty "pptp IP_OR_FQDN_VPN_SERVER --nolaunchpppd" file /etc/ppp/options.pptp user USERNAME password PASSWORD

replace IP_OR_FQDN_VPN_SERVER with IP or DNS of your VPS server.
replace USERNAME with your VPN username.
replace PASSWORD with your VPN password.
wait for like 10-15 seconds , then run ifconfig command , you should see ppp0 interface there , if it is not there , you can troubleshoot by looking into syslog of your linux.
please note this command is good for connecting to a windows VPN server with default configuration , if you have any custom settings , you may need to edit /etc/ppp/options.pptp file.
to disconnect form VPN , use the following command :

killall pppd

if you need to route all of your traffic to VPN server ( use it as a gateway ) , do the following :
create a file named vpn-up in /etc/ppp/ip-up.d and put the following lines inside it :

#!/bin/bash
H=`ps aux | grep 'pppd pty' | grep -v grep | awk '{print $14}'`
DG=`route -n | grep UG | awk '{print $2}'`
DEV=`route -n | grep UG | awk '{print $8}'`
route add -host $H gw $DG dev $DEV
route del default $DEV
route add default dev ppp0

and make it executable by :

chmod +x vpn-up

create another file named vpn-down in /etc/ppp/ip-down.d and put the following lines inside it :

#!/bin/bash
H=`route -n | grep UGH | awk '{print $1}'`
DG=`route -n | grep UGH | awk '{print $2}'`
DEV=`route -n | grep UGH | awk '{print $8}'`
route del -host $H
route add default gw $DG dev $DEV

and make it executable by :

chmod +x vpn-down

now reconnect to VPN , and your routing will be done automatically.
April 25, 2010

Block port 25 in Routing and Remote Access (RAS) to prevent spam

Filed under: General — admin @ 9:05 am

If you have a VPN server running on windows using routing and remote access , some of your users may abuse your VPN service by sending spam emails from your IP.
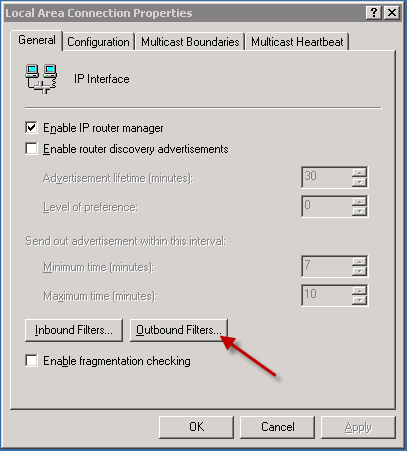
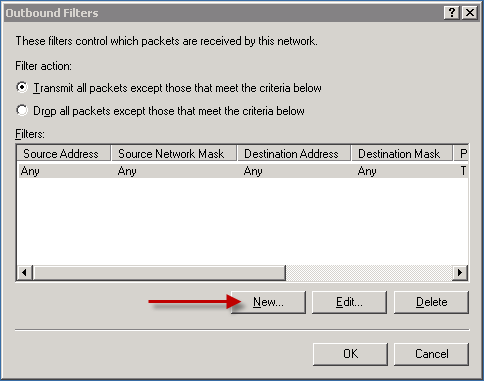
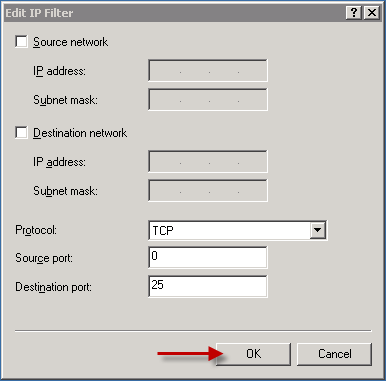
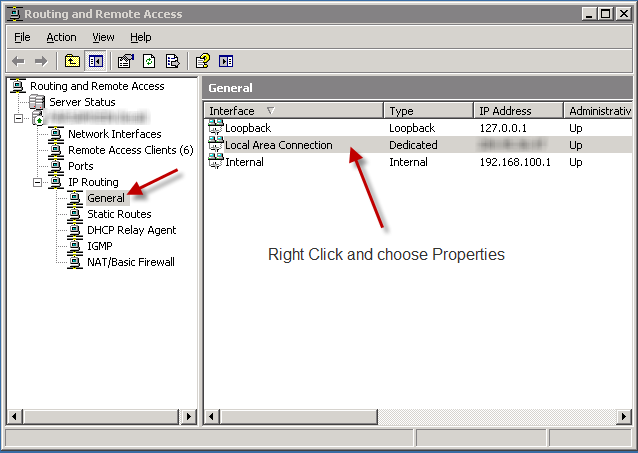
in order to prevent it , you need to block outgoing port 25 ( SMTP ). here is an illustrated guide on how to do it in RAS :

Excellent windows dump file analyzer

Filed under: General — Tags: , , , , , , , , , — admin @ 8:53 am

Today I had a BSOD ( Blue Screen Of Death ) on one of my windows servers and after searching the net , I found an invaluable tool which can simplify analyzing the dump file generated by windows after the crash to find out the root cause of crash.
This tool is a must have for every windows system administrator , for more information visit the following link :
WhoCrashed Comprehensible Crash Dump Analyzer

April 20, 2010

April 10, 2010

Benchmark network throughput between 2 systems

Filed under: General,Windows — Tags: , , , , , , — admin @ 2:22 pm

Today I had 2 systems connected to each other with Mellanox MT25208 InfiniBand cards with 40Gbps speed ( it is fast , isnt it ? 😀 ) , after setting up IPoIB ( IP on InfiniBand ) on cards. I wanted to make sure I really have 40Gbps speed , so I searched the net for a network throughput benchmark utility and I found a great software named PCAUSA Test TCP (PCATTCP)
You can download its latest version from its original site : Original Download Page
Or from my site : PCATTCP-0111.zip
Usage :
you have to run a receiver on one of systems by following command :

PCATTCP.exe -r

the default setting was not optimized for testing a 40Gbps line , so I used the following command on transmitter part :

PCATTCP.exe -t -l 819200 -n 1024 10.0.0.1

10.0.0.1 is the IP of receiver part.
You are curious to know the result ? 😀 Here it is :

PCAUSA Test TCP Utility V2.01.01.11
Started TCP Transmit Test 0...
TCP Transmit Test
  Transmit    : TCP -> 10.0.0.1:5001
  Buffer Size : 819200; Alignment: 16384/0
  TCP_NODELAY : DISABLED (0)
  Connect     : Connected to 10.0.0.1:5001
  Send Mode   : Send Pattern; Number of Buffers: 1024
  Statistics  : TCP -> 10.0.0.1:5001
838860800 bytes in 1.97 real seconds = 416683.62 KB/sec +++
numCalls: 1024; msec/call: 1.97; calls/sec: 520.85

Yes , I have a working 40Gbps line 😀

April 9, 2010

Free Under construction page for your website

Filed under: General,HTML — Tags: , , , , , — admin @ 7:32 pm

You can download a free under construction page for your website here :
http://adminsehow.com/files/Under%20Construction%20Page.zip

April 4, 2010

Configure Powerdns to use MVPS.org Hosts file

Filed under: General — Tags: , , , — admin @ 4:20 pm

One of the solutions to increase your PC security and block ads, counters, malwares and etc is to use a HOSTS file on your windows so the DNS address of such sites is resolved to localhost (127.0.0.1) instead of correct address.
Simply using a HOSTS file is not a cure-all against all the dangers on the Internet, but it does provide another very effective “Layer of Protection”.
The original idea is explained on this link : http://www.mvps.org/winhelp2002/hosts.htm
As the above link explains , you can put HOSTS file inside your windows system files and it will do the trick , but this solution has its own complexities and downsides , a better solution is to have a DNS server which uses MVPS HOSTS file to block malware sites and then point your PC DNS entries to it.
like 1 year ago I explained how to install PowerDNS as a caching DNS server – HERE – now I want to explain how you can configure it to use MVPS HOSTS file to block malware site and update it automatically.
Please note you should have perl installed on your server for this script to work.

Go to /etc/powerdns folder and create the following files :

null.zone.file :

; BIND db file for ad servers - point all addresses to localhost
;
; This file comes from:
;
;       http://adminsehow.com

$TTL    86400   ; one day

@       IN      SOA     ns0.example.net.      hostmaster.example.net. (
                        2002061000       ; serial number YYMMDDNN
                        28800   ; refresh  8 hours
                        7200    ; retry    2 hours
                        864000  ; expire  10 days
                        86400 ) ; min ttl  1 day
                NS      ns0.example.net.
                NS      ns1.example.net.

                A       127.0.0.1

*               IN      A       127.0.0.1

auth-zone.pl :

local $/=undef;
open FILE, "hosts.txt" or die "Couldn't open file: $!";
binmode FILE;
$subject = <FILE>;
close FILE;

$a='auth-zones=';

while ($subject =~ m/127\.0\.0\.1[ ]+(([a-z0-9]+(-[a-z0-9]+)*\.)+[a-z]{2,4})/ixg) {
  $a=$a.$1."=null.zone.file,";
}

print "$a";

update-auth-zone :

cd /etc/powerdns
rm -f hosts.txt
wget -q "http://www.mvps.org/winhelp2002/hosts.txt"
perl auth-zone.pl > auth.zone
sed -i "/auth-zones=/d" recursor.conf
cat auth.zone >> recursor.conf
/etc/init.d/pdns-recursor restart > /dev/null 2>&1
rm -f hosts.txt
rm -f auth.zone

make update-auth-zone executable :

chmod +x update-auth-zone

execute update-auth-zone once :

./update-auth-zone

open crontab by “crontab -e” command and add the following line to it :

@weekly /etc/powerdns/update-auth-zone

this cron job will automatically update your powerdns configuration based on MVPS HOSTS file weekly.

Currently I have configured my own DNS server 216.155.148.9 to use MVPS HOSTS file , feel free to use it as your primary DNS Server if you like 🙂

Powered by WordPress