Admins eHow SysAdmin Tips & Tricks

July 24, 2009

Delete Files Older Than x Days on Linux

Filed under: CentOS,Debian,General — Tags: , , , — admin @ 1:40 pm

The find utility on linux allows you to pass in a bunch of interesting arguments, including one to execute another command on each file. We’ll use this in order to figure out what files are older than a certain number of days, and then use the rm command to delete them.

Command Syntax

find /path/to/files* -mtime +5 -exec rm {} \;

Note that there are spaces between rm, {}, and \;

Explanation

  • The first argument is the path to the files. This can be a path, a directory, or a wildcard as in the example above. I would recommend using the full path, and make sure that you run the command without the exec rm to make sure you are getting the right results.
  • The second argument, -mtime, is used to specify the number of days old that the file is. If you enter +5, it will find files older than 5 days.
  • The third argument, -exec, allows you to pass in a command such as rm. The {} \; at the end is required to end the command.

or you can use the following command :

find /path/to/files* -mtime +5 | xargs rm -f

This should work on Ubuntu, Suse, Redhat, or pretty much any version of linux.

July 19, 2009

How to enable mod_rewrite on Apache2

Filed under: Apache,Debian,General — Tags: , — admin @ 12:51 pm
a2enmod rewrite
/etc/init.d/apache2 restart

July 15, 2009

How to install ffmpeg on Debian Lenny from SVN

Filed under: Debian,General — Tags: , , , — admin @ 11:36 am

From ffmpeg.org :

FFmpeg is a complete, cross-platform solution to record, convert and stream audio and video. It includes libavcodec – the leading audio/video codec library.

Installation Guide :
download the following debian package and install it :

wget http://www.debian-multimedia.org/pool/main/d/debian-multimedia-keyring/debian-multimedia-keyring_2008.10.16_all.deb
dpkg -i debian-multimedia-keyring_2008.10.16_all.deb 

Add the following lines to your /etc/apt/source.list :

nano /etc/apt/nano sources.list
deb http://www.debian-multimedia.org lenny main
deb-src http://www.debian-multimedia.org lenny main

update your apt cache :

apt-get update

install needed utils :

apt-get install checkinstall yasm git-core subversion

install ffmpeg dependencies :

apt-get build-dep ffmpeg

Install x264 :

git clone git://git.videolan.org/x264.git
cd x264
./configure
make
checkinstall --pkgname=x264 --pkgversion "1:0.svn`date +%Y%m%d`" --backup=no --default

Install libtheora :

wget http://downloads.xiph.org/releases/theora/libtheora-1.1.1.tar.gz
tar xzvf libtheora-1.1.1.tar.gz
cd libtheora-1.1.1
./configure
make
checkinstall --pkgname=libtheora --pkgversion "1.1.1" --backup=no --default

remove old libx264-dev :

apt-get remove libx264-dev

download the latest release of ffmpeg using subversion :

svn checkout svn://svn.mplayerhq.hu/ffmpeg/trunk ffmpeg

configure and make ffmpeg :

cd ffmpeg/
./configure --enable-version3 --enable-libmp3lame --enable-libtheora --enable-libx264 --enable-libgsm --enable-postproc --enable-libxvid --enable-libfaac --enable-pthreads --enable-libvorbis --enable-gpl --enable-x11grab --enable-nonfree
make
checkinstall --pkgname=ffmpeg --pkgversion "4:0.5+svn`date +%Y%m%d`" --backup=no --default

and we are all set 🙂
just one more note , if you are going to convert flv files to 3gp files like me 😀 use the following command :

ffmpeg -i input.flv -s 176x144 -vcodec h263 -acodec aac output.3gp

July 14, 2009

Limit Connections per IP using mod_limitipconn on cPanel

Filed under: Apache,CentOS,cPanel,General,Security — Tags: , , , , , , — admin @ 9:41 am

one of the problems I had on one of my cPanel servers was that some people were using download managers to download files from server , so hundreds of connections were being ESTABLISHED to Apache and it was becoming like a dos attack and causing Apache to become non responsive.
so here is what I did to limit connections per IP in a cPanel hosting server :
there is an Apache module named mod_limitipconn which will take care of it for us.
first download the latest version of mod_limitipconn from this site : http://dominia.org/djao/limitipconn2.html
decompress and install it.
at current time the latest version is 0.23.

wget http://dominia.org/djao/limit/mod_limitipconn-0.23.tar.bz2
tar jxvf mod_limitipconn-0.23.tar.bz2
cd mod_limitipconn-0.23
/usr/local/apache/bin/apxs -cia mod_limitipconn.c

next step is to add the required configuration to the Apache config file , we can add this directly to the end of httpd.conf file but the problem is that if we do this , the httpd.conf will be overwritten by easyapache so we will use include files to add our config.
login into your WHM panel , and follow the following menu items :
Main >> Service Configuration >> Apache Configuration >> Include Editor
on the Post VirtualHost Include section , choose All Versions from drop down menu and add the following config into it :

<IfModule mod_limitipconn.c>
<Location />
MaxConnPerIP 10
NoIPLimit images/*
</Location>
</IfModule>

then click on update and restart Apache server.
now We are all set 🙂

July 12, 2009

Backup Your Data in Linux by sending them to your GMail

Filed under: CentOS,Debian,General,Security — Tags: , , , — admin @ 8:33 am

A very effective way for backing up your data on a Linux server is to set a cron job on your box to mail your data to your GMail account. GMail servers are very reliable and give you a huge amount of space for free. so they are pretty suitable for backing up sensitive data.
In order to accomplish this , first create a directory named “backup” in the root directory of your box :

cd / && mkdir backup

then you need to create a script to do the backup and mail it for you.

nano /usr/bin/backup

copy and paste the following into the file :

cd /backup
rm -rf /backup/*
cp LIST_OF_FILES .
tar jcf backup.tar.bz2 *
echo | mutt -a backup.tar.bz2 -s "my daily backup" -- adminsehow@gmail.com

you have to change LIST_OF_FILES string to the list of the files you want to be backed up separated by space , and change adminsehow@gmail.com to your own gmail account.
as you can see in the script we are compressing the data files to make them as small as possible.
also we are using “mutt” to send emails so you need to install it , in Debian you can install it by following command :

apt-get install mutt

make the script executable :

chmod +x /usr/bin/backup

lastly you need to set a cron job , so open the cron file by following command :

crontab -e

and copy and paste the following command into it :

0 0 * * * /usr/bin/backup

it will run your backup script once daily 🙂
also don’t forget you need to have a working smtp server on your Linux box.

June 29, 2009

How to synchronize Linux Time Daily

Filed under: CentOS,Debian,General — Tags: , , , , — admin @ 6:51 pm

First you need to install rdate package.
For Debian :

apt-get install rdate

For CentOS :

yum install rdate

After installing the rdate package , install a new cron job to be run daily to synchronize your machine time and date.

crontab -e

and enter the following line into the cron file :

0 0 * * * /usr/bin/rdate -s time-nw.nist.gov && /sbin/hwclock --systohc

June 27, 2009

How to use windows VPS For Forex Traders

Filed under: Forex,Windows — Tags: , , , , — admin @ 4:11 pm

Edited 2 April 2011

Where to get a suitable Windows VPS for Forex Traders ?

This questions has been asked many times from me , so I am going to explain whats behind the scene of windows VPS hosting so you can have a better view of it.
First we should know what we need for forex hosting , do we need a lot of space ? a lot of ram ? a lot of traffic ? the answer is NO , we need very high network uptime and VPS stability , so it is very different from VPS’s which are used for hosting purposes , a crash on a website hosting VPS may result on several minutes of downtime which may not be very important , but on a forex VPS can cause thousands of dollars of loss or interruption in EA work which is important for sure.
Currently there are several virtualization technologies , but most used are two :

  • Virtuozzo by Parallels Company : 95% of windows VPS’s on market use this technology , it is a software layer virtualization , resources are not dedicated and overall I dont recommend it for Forex Hosting , but you may ask so why many hosting companies use this technology. the reason is that it makes more money for them , as the resources are not dedicated in virtuozzo , hosting companies can oversell the server. for example they get a server with 8GB of ram and can sell 100 VPS’s on it with a total of 32GB of Ram ! honestly I dont like the technologies which allow companies to cheat on people , These companies use virtuozzo and I suggest to avoid them for forex hosting : ForexVPS.com – CommercialNetworkServices.com (CNS) – SWVPS.com – VPSLand.com and many many more.
  • Hyper-V by Microsoft : This technology is new and was introduced in Windows Server 2008 , it is a hardware layer virtualization , resources are dedicated and very stable. it is very very close to a dedicated server. so it is highly recommended it for forex VPS hosting. using this technology hosting companies can not cheat on people so it’s more expensive than virtuozzo. it is a real deal !

The company which I recommend for forex VPS hosting is BBVPS.com , they have a very solid network and they use Hyper-V technology and very good supprt. they are my choice for forex vps hosting 🙂

How to connect to your windows VPS :

In order to connect to a windows VPS remotely , you need to use a software named “Remote Desktop Connection” which is bundled with all versions of windows.
under windows XP it is located under : All Programs –> Accessories –> Communications
under windows Vista it is located under : All Programs –> Accessories
after running this software you will see the following window , enter the IP or host name of your VPS into the computer filed and click on Connect.

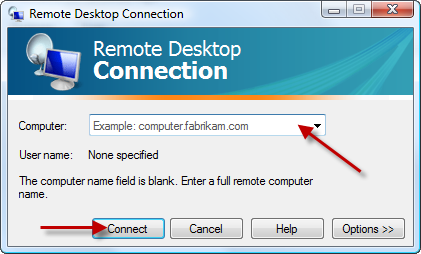
after a few seconds a new windows will be opened and you will be asked for the username and password , enter the username and password which is provided by your windows VPS provider. usually the username is Administrator.
if you enter the login details successfully , the desktop of windows VPS will be shown to you.
in order to install any software like Meta Trader or any other trading stations , it is exactly like how you install them on your home PC , you can run internet explorer on your VPS , download the software you need and install and use it.

Disable Automatic Updates :
Automatic Updates may restart your VPS automatically and close your running trading platforms. so for a trading station it is wise to disable automatic updates.
in order to disable automatic updates on windows 2003 :
Right click on My Computer -> Properties -> Automatic Updates -> Choose OFF -> Click on OK

Change Your VPS Password :
Read this article : How to change windows 2003 password

How to transfer files from home PC to windows VPS :

The best solution is using Dropbox, using it is very simple and their own website has a comprehensive guide on how to use it. It has many features, so I am not going to dig into the details.The idea is that you install Dropbox software on your home computer and Windows VPS. It will create a folder called Dropbox. What you copy inside the Dropbox on your home computer will be copied into the Dropbox on your VPS automatically and vice versa. Create a free 2GB account and receive an extra 500MB bonus cloud storage using this link :

Create a free account : Dropbox Free Account

How to install several MT4 instances of same broker on your VPS :
most of users want to install several instances of MT4 on their VPS. if MT4s are from different brokers , there would be no conflict. they will install in different folders and by different shurtcut names. but if you want to install several instances of MT4 from one broker then you should :
1.Rename the MT4 shortcut on your desktop to something else.
2.Run MT4 installer , but when it asks where to install the new MT4 , choose a different folder. you can add a number to end of folder name.
3.Complete the installation.

The above procedure installs another MT4 from same broker on your VPS with a separate shortcut on your VPS desktop.

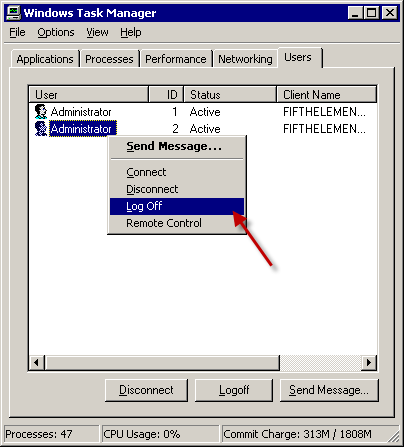
Make Sure only one session is running :
one of the common problems of traders is that most of them are not familiar with remote desktop multi session functionality.
remote desktop allows to connect to windows VPS in different sessions , in other words you can have several ( generally 2 ) independent desktops.
so for example if you run a trading station on session one and before closing it you login to VPS again using remote desktop connection , a new desktop will be opened for you which wont show your running programs in session one. most traders may think their VPS is restarted or/and their platform is closed while in fact it is running in other session.
therefore it is very important to always make sure you run only one session or if you want to run more , you have to know what you do exactly.
in order to determine how many sessions are running on your VPS , enter your windows task manager ( Start -> Run -> type “taskmgr.exe” and enter ) and then go to users tab , there you can see the logged in users on your VPS. if there is more than one there. it means there is two or more sessions are running.
you can simply connect to or logoff the extra sessions by right clicking on them and choosing the proper option.

How to Exit from VPS ?

after you have your softwares running on your VPS , do not shutdown or logoff from your VPS. it will cause your programs to be closed.
simply click on the [x] button of the VPS desktop button and click OK on the next confirmation window.

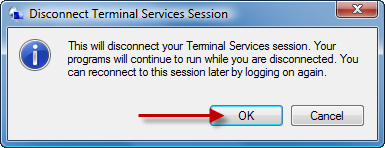
the next time you connect to your VPS , you can see your programs are still running there.

June 26, 2009

bash: /bin/rm: Argument list too long

Filed under: CentOS,Debian,General — Tags: — admin @ 1:44 pm

Use the following command the directory to solve the problem :

ls | xargs rm

June 22, 2009

Remove comments and empty lines on linux using sed command

Filed under: CentOS,Debian,General — Tags: , , , , — admin @ 10:24 am
sed -e '/^\s*#.*$/d' -e '/^\s*$/d' filename

June 19, 2009

Fix Windows Media Player mms:// problem

Filed under: General,Windows — Tags: , , , — admin @ 2:35 pm

If you want to watch a mms:// stream and windows media player gives you the following error :

Windows Media Player cannot play the file because the specified protocol is not supported. If you typed a URL in the Open URL dialog box, try using a different transport protocol (for example, "http:" or "rtsp:").

Here is the solution :
1.Click on Start
2.Click on Run…
3.Type the following command and press enter :

regsvr32 wmnetmgr.dll

« Newer PostsOlder Posts »

Powered by WordPress