Admins eHow SysAdmin Tips & Tricks

June 4, 2010

Protect Apache against Dos/DDos attacks using mod_evasive

Filed under: Apache,cPanel,Security — Tags: , , , , , , — admin @ 11:21 am

mod_evasive is a module for Apache (both 1.3 and 2.0) giving Apache the ability to detect and fend off request-based DoS/DDoS attacks and brute-force attacks conserving your system resources and bandwidth. This tool can be configured to report abusers and even talk to network gear (such as a firewall or ipchains).

in this article we explain how to install mod_evasive on Apache 2 :

wget http://www.zdziarski.com/blog/wp-content/uploads/2010/02/mod_evasive_1.10.1.tar.gz
tar zxvf mod_evasive_1.10.1.tar.gz
cd mod_evasive
/usr/local/apache/bin/apxs -cia mod_evasive20.c

next step is to add the required configuration to the Apache config file , we can add this directly to the end of httpd.conf file but the problem is that if we do this , the httpd.conf will be overwritten by easyapache so we will use include files to add our config.
login into your WHM panel , and follow the following menu items :
Main >> Service Configuration >> Apache Configuration >> Include Editor
on the Pre Main Include section , choose All Versions from drop down menu and add the following config into it :

<IfModule mod_evasive20.c>
DOSHashTableSize 3097
DOSPageCount 5
DOSSiteCount 50
DOSPageInterval 1
DOSSiteInterval 1
DOSBlockingPeriod 600
</IfModule>

then click on update and restart Apache server.
May 22, 2010

Check connected IPs to port 80 and number of connections on linux

Filed under: Apache,linux,Security — admin @ 6:57 pm
netstat -plan|grep :80|awk {'print $5'}|cut -d: -f 1|sort|uniq -c|sort -nk 1

May 17, 2010

How to check domain NS glue records using dig

Filed under: dns — Tags: , , , , , — admin @ 11:52 am

Lets check microsoft.com NS glue records by dig command.

As it is a .com domain first we should check root servers for .com by the following command :

dig NS com

Result :

com.                    22124   IN      NS      d.gtld-servers.net.
com.                    22124   IN      NS      f.gtld-servers.net.
com.                    22124   IN      NS      a.gtld-servers.net.
com.                    22124   IN      NS      c.gtld-servers.net.
com.                    22124   IN      NS      g.gtld-servers.net.
com.                    22124   IN      NS      i.gtld-servers.net.
com.                    22124   IN      NS      l.gtld-servers.net.
com.                    22124   IN      NS      m.gtld-servers.net.
com.                    22124   IN      NS      k.gtld-servers.net.
com.                    22124   IN      NS      e.gtld-servers.net.
com.                    22124   IN      NS      h.gtld-servers.net.
com.                    22124   IN      NS      b.gtld-servers.net.
com.                    22124   IN      NS      j.gtld-servers.net.

We can choose any root server for next query , I will choose m.gtld-servers.net :

dig NS microsoft.com @m.gtld-servers.net

Result :

;; AUTHORITY SECTION:
microsoft.com.          172800  IN      NS      ns1.msft.net.
microsoft.com.          172800  IN      NS      ns2.msft.net.
microsoft.com.          172800  IN      NS      ns3.msft.net.
microsoft.com.          172800  IN      NS      ns4.msft.net.
microsoft.com.          172800  IN      NS      ns5.msft.net.

;; ADDITIONAL SECTION:
ns1.msft.net.           172800  IN      A       65.55.37.62
ns2.msft.net.           172800  IN      A       64.4.59.173
ns3.msft.net.           172800  IN      A       213.199.161.77
ns4.msft.net.           172800  IN      A       207.46.75.254
ns5.msft.net.           172800  IN      A       65.55.226.140

OK we are done , the ADDITIONAL SECTION in last query contains the glue records :

ns1.msft.net.           172800  IN      A       65.55.37.62
ns2.msft.net.           172800  IN      A       64.4.59.173
ns3.msft.net.           172800  IN      A       213.199.161.77
ns4.msft.net.           172800  IN      A       207.46.75.254
ns5.msft.net.           172800  IN      A       65.55.226.140

May 11, 2010

“ASN1 bad tag value met” error when processing a certificate request in IIS 7

Filed under: IIS,Windows — Tags: , , , , , — admin @ 12:48 pm

We’ve seen a few instances of the following error message on 64 bit servers when IIS 7.0 is attempting to process a pending certificate request:

Complete Certificate Request
There was an error while performing this operation.
Details:
CertEnroll::CX509Enrollment::p_InstallResponse: ASN1 bad tag value met. 0x8009310b (ASN: 267)

This error seems to mean that the private key (created when the certificate request was made) does not match the public key (the .crt file). The keypair is not successfully joined into a working SSL certificate.
So far this behavior seems most common with .crt files (instead of the .cer files many of us are more used to) issued by one specific Certification Authority—which will remain nameless here.
The error shows up after reaching the point in the process where you ‘specify certificate authority response’ and guide the wizard to the ‘File name containing the certification authority’s response…’ (the .crt file).

Solution :
Begin by importing the .crt file into the Personal certificate store for the local computer. (Start button > Run: MMC > File Menu > Add/Remove Snap-in > highlight Certificates snap-in and click the ADD button > select Computer Account and click Finish > Click OK > drill into Personal > Certificates > right-click and select All Tasks > select Import > guide to the .crt file.) At this point your certificate is basically a half-certificate. It is still missing its private key.
Second, double-click the crt certificate file you just imported, select the Details tab, scroll all the way down to Thumbprint and highlight Thumbprint. In the lower pane, block and copy all the letters of the thumbprint. Paste the thumbprint characters into notepad. Open the command prompt and run this command: Certutil /?
The command you’ll want to run is:

certutil -repairstore my "{insert all of the thumbprint characters here}"

When you see the response: “CertUtil: -repairstore command completed successfully” you should have a private key associated with the .crt file in the personal store. There should no longer be any need to run through the “Complete Certificate Request…” wizard. The certificate should show up in the IIS Manager’s list of server certificates at this point. It should also be available in the SSL Certificates drop-down list when attempting to edit the https binding for a website.

Source

April 30, 2010

Connect to PPTP VPN from Linux only by one command

Filed under: CentOS,Debian,General — Tags: , , , , , , , , , — admin @ 1:03 pm

I’ve used this method to connect to a windows PPTP VPN server on PCLinuxOS 2010 , but I am sure it will work on other ditros too.
First make sure sure pptp-linux and ppp packages are installed on your client PC.
you may install them by yum or apt-get or package manager of your linux.
then use the following command to connect to VPN.

pppd pty "pptp IP_OR_FQDN_VPN_SERVER --nolaunchpppd" file /etc/ppp/options.pptp user USERNAME password PASSWORD

replace IP_OR_FQDN_VPN_SERVER with IP or DNS of your VPS server.
replace USERNAME with your VPN username.
replace PASSWORD with your VPN password.
wait for like 10-15 seconds , then run ifconfig command , you should see ppp0 interface there , if it is not there , you can troubleshoot by looking into syslog of your linux.
please note this command is good for connecting to a windows VPN server with default configuration , if you have any custom settings , you may need to edit /etc/ppp/options.pptp file.
to disconnect form VPN , use the following command :

killall pppd

if you need to route all of your traffic to VPN server ( use it as a gateway ) , do the following :
create a file named vpn-up in /etc/ppp/ip-up.d and put the following lines inside it :

#!/bin/bash
H=`ps aux | grep 'pppd pty' | grep -v grep | awk '{print $14}'`
DG=`route -n | grep UG | awk '{print $2}'`
DEV=`route -n | grep UG | awk '{print $8}'`
route add -host $H gw $DG dev $DEV
route del default $DEV
route add default dev ppp0

and make it executable by :

chmod +x vpn-up

create another file named vpn-down in /etc/ppp/ip-down.d and put the following lines inside it :

#!/bin/bash
H=`route -n | grep UGH | awk '{print $1}'`
DG=`route -n | grep UGH | awk '{print $2}'`
DEV=`route -n | grep UGH | awk '{print $8}'`
route del -host $H
route add default gw $DG dev $DEV

and make it executable by :

chmod +x vpn-down

now reconnect to VPN , and your routing will be done automatically.

April 25, 2010

Block port 25 in Routing and Remote Access (RAS) to prevent spam

Filed under: General — admin @ 9:05 am

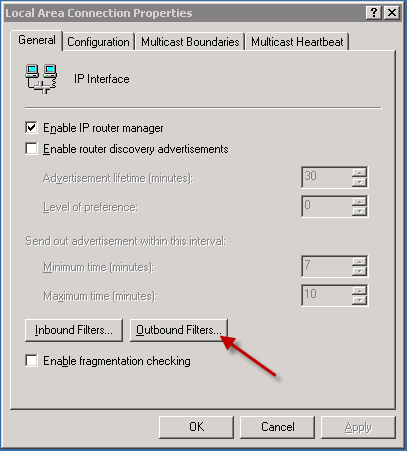
If you have a VPN server running on windows using routing and remote access , some of your users may abuse your VPN service by sending spam emails from your IP.
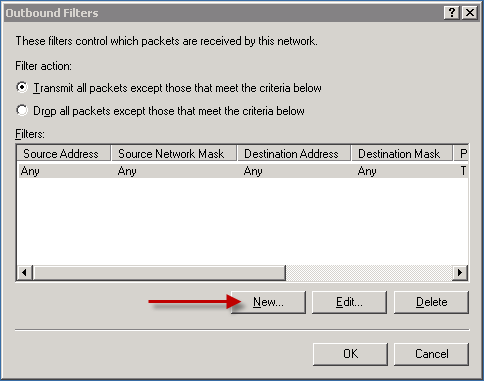
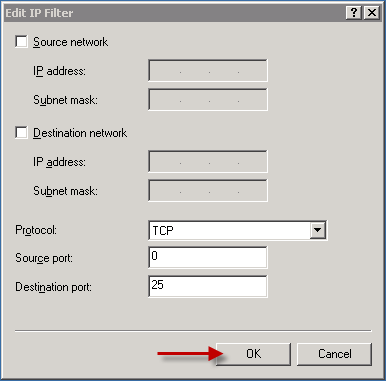
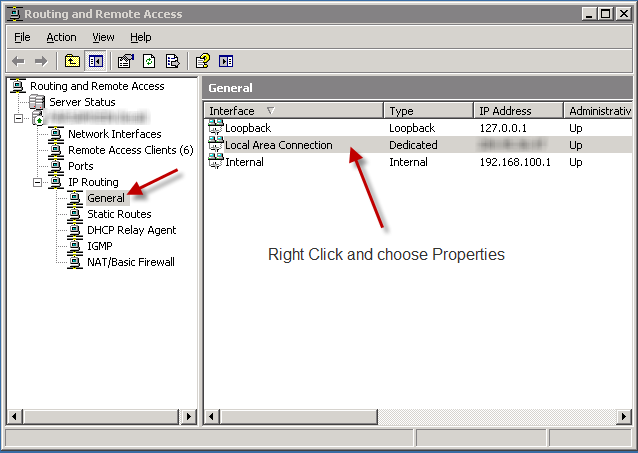
in order to prevent it , you need to block outgoing port 25 ( SMTP ). here is an illustrated guide on how to do it in RAS :

Excellent windows dump file analyzer

Filed under: General — Tags: , , , , , , , , , — admin @ 8:53 am

Today I had a BSOD ( Blue Screen Of Death ) on one of my windows servers and after searching the net , I found an invaluable tool which can simplify analyzing the dump file generated by windows after the crash to find out the root cause of crash.
This tool is a must have for every windows system administrator , for more information visit the following link :
WhoCrashed Comprehensible Crash Dump Analyzer

April 20, 2010

April 10, 2010

Benchmark network throughput between 2 systems

Filed under: General,Windows — Tags: , , , , , , — admin @ 2:22 pm

Today I had 2 systems connected to each other with Mellanox MT25208 InfiniBand cards with 40Gbps speed ( it is fast , isnt it ? 😀 ) , after setting up IPoIB ( IP on InfiniBand ) on cards. I wanted to make sure I really have 40Gbps speed , so I searched the net for a network throughput benchmark utility and I found a great software named PCAUSA Test TCP (PCATTCP)
You can download its latest version from its original site : Original Download Page
Or from my site : PCATTCP-0111.zip
Usage :
you have to run a receiver on one of systems by following command :

PCATTCP.exe -r

the default setting was not optimized for testing a 40Gbps line , so I used the following command on transmitter part :

PCATTCP.exe -t -l 819200 -n 1024 10.0.0.1

10.0.0.1 is the IP of receiver part.
You are curious to know the result ? 😀 Here it is :

PCAUSA Test TCP Utility V2.01.01.11
Started TCP Transmit Test 0...
TCP Transmit Test
  Transmit    : TCP -> 10.0.0.1:5001
  Buffer Size : 819200; Alignment: 16384/0
  TCP_NODELAY : DISABLED (0)
  Connect     : Connected to 10.0.0.1:5001
  Send Mode   : Send Pattern; Number of Buffers: 1024
  Statistics  : TCP -> 10.0.0.1:5001
838860800 bytes in 1.97 real seconds = 416683.62 KB/sec +++
numCalls: 1024; msec/call: 1.97; calls/sec: 520.85

Yes , I have a working 40Gbps line 😀

April 9, 2010

Free Under construction page for your website

Filed under: General,HTML — Tags: , , , , , — admin @ 7:32 pm

You can download a free under construction page for your website here :
http://adminsehow.com/files/Under%20Construction%20Page.zip

« Newer PostsOlder Posts »

Powered by WordPress