Replace [PORT] & [CON_NUM] with respected values.
iptables -I INPUT -p tcp --syn --dport [PORT] -m connlimit --connlimit-above [CON_NUM] --connlimit-mask 0 -j REJECT --reject-with tcp-reset
Replace [PORT] & [CON_NUM] with respected values.
iptables -I INPUT -p tcp --syn --dport [PORT] -m connlimit --connlimit-above [CON_NUM] --connlimit-mask 0 -j REJECT --reject-with tcp-reset
A Transparent SSL Socks proxy can be useful to encrypt and secure all TCP connections and/or infiltrate Internet censorship systems.
In order to make this setup, you need two Linux based boxes, one in your local network and one which will act as server in a remote location.
Theoretically what we are going to achieve is to intercept all TCP connections on our local network transparently, encrypt them and then tunnel them to our remote server.
This can be achieved easily using a powerful Linux application called Stunnel.
In my own setup, I am using a raspberry pi 2 for my local device. it is a cheap device and has a very low power usage and can be running 24/7, so it is very suitable to act as a full featured Linux based router. although you can use a PC or a virtual machine to achieve the same.
Debian is my favorite Linux distro, so my guide will be based on Debian.
Enough introduction, lets get started.
Part I: Setting up SSL Socks Proxy
1.Install stunnel on both local and remote devices:
Download and install the latest version of stunnel from stunnel website: https://www.stunnel.org/downloads.html
You may need to compile it from source.
2.Create stunnel config on local device /etc/stunnel/stunnel.conf:
foreground = no
socket = r:TCP_NODELAY=1
output = /var/log/stunnel.log
#compression = zlib
syslog = no

[SOCKS Client Direct]
client = yes
PSKsecrets = /etc/stunnel/secrets.txt
accept = 0.0.0.0:LOCAL_PORT
connect = REMOTE_SERVER_IP:REMOTE_PORT
protocol = socks
LOCAL_PORT: The local port which stunnel will listen on.
REMOTE_SERVER_IP: The remote server IP.
REMOTE_PORT: The port which remote server will accept connections on.
Note I: I noticed raspbian prebuilt openssl package doesn’t support zlib compression, so in my case I had to recompile openssl with zlib support. If you have an openssl package with zlib support you can uncomment “compression = zlib” line.
Note II: If you need to see the log messages for debug purposes, you can set “foreground = yes” temporarily. “foreground = no” makes stunnel to run in daemon mode.
3.Create local PreShareKey secret file /etc/stunnel/secrets.txt:
USERNAME:PASSWORD_MORE_THAN_20_CHARS
pick your username and password accordingly.
4.Create stunnel config on remote server /etc/stunnel/stunnel.conf:
foreground = no
socket = l:TCP_NODELAY=1
#compression = zlib

[SOCKS Server]
PSKsecrets = /etc/stunnel/secrets.txt
accept = 0.0.0.0:REMOTE_PORT
protocol = socks
REMOTE_PORT: The port which remote server will accept connections on.
The notes which I mentioned in previous section also apply to this section.
5.Create /etc/stunnel/secrets.txt on remote server identical to secrets file on local device.
6.Run both stunnel instances on local device and remote server.
stunnel /etc/stunnel/stunnel.conf
Part II: Making the SSL Socks Proxy Transparent
In order to make the SSL Socks Proxy Transparent, we need to setup our local device as the router and gateway of our local network and intercept all TCP connections.
The following settings should be made on local device.
1.Enable IPv4 forwarding in /etc/sysctl.conf:
net.ipv4.ip_forward=1
and apply the changes:
sysctl -p
2.Redirect all TCP connections to socks proxy:
iptables -t nat -A PREROUTING -p tcp -d LOCAL_IP_ADDRESS_CLASS -j ACCEPT
iptables -t nat -A PREROUTING -p tcp -j REDIRECT --to-ports LOCAL_PORT

iptables -t nat -A OUTPUT -p tcp -d REMOTE_SERVER_IP --dport REMOTE_PORT -j ACCEPT
iptables -t nat -A OUTPUT -o lo -j ACCEPT
iptables -t nat -A OUTPUT -p tcp -j REDIRECT --to-ports LOCAL_PORT
LOCAL_IP_ADDRESS_CLASS: It is very important to set this option correctly otherwise you will lose your network access to your local device. it should be the network address of your local network for example : 192.168.0.0/16 or 10.0.0.0/8 or 192.168.1.0/24
LOCAL_PORT: The local port which stunnel is listening on.
REMOTE_SERVER_IP: The remote server IP.
REMOTE_PORT: The port which remote server will accept connections on.
The PREROUTING rules redirects all TCP connections of other clients on the LAN to Socks Proxy and The OUTPUT rules redirects all TCP connections of local device to Socks Proxy.
3.Set the gateway of network devices on local network to local device IP address. you can configure it manually or configure your DHCP server to assign the new gateway to DHCP clients. if you have an advanced router, you can probably set it up in your router configuration, otherwise you may need to disable your router DHCP server and install a full featured DHCP server on your local device.
Part III: Setting up DHCP server (OPTIONAL)
1.Install ISC DHCP server:
apt-get install isc-dhcp-server
2.Create /etc/dhcp/dhcpd.conf:
ddns-update-style none;
option domain-name-servers 192.168.1.2;
authoritative;
log-facility local7;
subnet 192.168.1.0 netmask 255.255.255.0 {
        range 192.168.1.50 192.168.1.100;
        option routers 192.168.1.2;
        option broadcast-address 192.168.1.255;
        default-lease-time 86400;
        max-lease-time 172800;
}
It is the exact configuration of my DHCP server, I think it is self explanatory.
192.168.1.2 is my local device (raspberry pi), you need to change it to your local device IP address and also change ranges and broadcast address accordingly.
If you are wondering why I am using my local device as my DNS server, you need to read the next section. you may want to use google public DNS servers 8.8.8.8 and 8.8.4.4.
Part IV: Forward DNS queries on a different port than 53(OPTIONAL)
One of common DNS attacks is called DNS Hijacking.
It is a very easy attack and is performed by hijacking your DNS requests which are sent on port 53 UDP, then the hijacker can send you any reply that he wants and you can not verify if it is a legitimate response or not. Unfortunately in most operating systems you can not configure DNS client to use a different port which is not hijacked or it is very hard to do.
I have invented a very simple, yet brilliant solution for this problem. it can be performed by doing two DNAT operations on our local device and remote server to reach a safe DNS server.
This solution does not encrypt or secure the request, but it changes the DNS port transparently to a non-hijacked port, which works fine 🙂
Here is how it is done:
1.Run the following commands on your local device:
iptables -t nat -A PREROUTING -p udp --dport 53 -d LOCAL_DEVICE_IP -j DNAT --to REMOTE_SERVER_IP:5353
iptables -t nat -A POSTROUTING -p udp --dport 5353 -d REMOTE_SERVER_IP -j SNAT --to LOCAL_DEVICE_IP
Change LOCAL_DEVICE_IP & REMOTE_SERVER_IP accordingly.
Edit: Although the above solution works, I found out it is better to install a caching DNS server on local device rather than forwarding every DNS queries to remote server.
1.Install pdnsd on local device:
apt-get install pdnsd
2.Make following changes to /etc/pdnsd.conf:
in global section:
server_ip = 0.0.0.0
in server section:
ip = REMOTE_SERVER_IP;
port = 5353;
3.Set “START_DAEMON=yes” in /etc/default/pdnsd
4.Restart pdnsd:
service pdnsd restart
5.Run the following commands on your remote server:
iptables -t nat -A PREROUTING -p udp --dport 5353 -d REMOTE_SERVER_IP -j DNAT --to 209.244.0.3:53
iptables -t nat -A POSTROUTING -p udp --dport 53 -d 209.244.0.3 -j SNAT --to REMOTE_SERVER_IP
Change REMOTE_SERVER_IP accordingly.
209.244.0.3 is the IP address of Level3 public DNS server. I used it because it had a very good ping to my remote server. you can use a different DNS server.
If you do it properly, your local device can be used as a DNS server and in my case it would act as Level3 public DNS server. not susceptible to port 53 DNS hijacking.
Part V: Setting up an encrypted TCP based DNS caching server (Solution II for secure DNS – OPTIONAL)
In my experience I noticed forwarding DNS queries on port 5353 can be unreliable and cause problems for web browsing, although there is no technical reason for this problem and it could be just my ISP dropping such UDP packets. also my previous solution was not encrypted and was just used to bypass DNS hijackers listening for DNS packets on port 53.
I tried a new solution and it works much more reliably. I encrypted local device (raspberry pi) TCP connections using 3 new iptables OUTPUT rules (which is explained above) and then set up my DNS caching server to resolve queries only on TCP. using TCP is several times more slower than UDP but it will be encrypted and reliable.
Here is how it is done:
1.Install pdnsd on local device:
apt-get install pdnsd
2.Make following changes to /etc/pdnsd.conf:
in global section:
server_ip = 0.0.0.0
query_method = tcp_only;
min_ttl = 86400;
in server section:
ip = 209.244.0.3;
Note: The DNS server you choose should support resolving DNS queries on TCP port 53. 209.244.0.3 is Level3 public DNS server and supports TCP DNS queries.
Note: “min_ttl = 86400” overrides the default TTL of DNS queries to 24 hours which is OK for 99.999% of websites. But if a website changes its DNS records meanwhile it is in pdnsd cache, you may need to flush the cache manually or wait up to 24 hours for the record to be updated.
3.Set “START_DAEMON=yes” in /etc/default/pdnsd
4.Restart pdnsd:
service pdnsd restart
Create “/etc/trackers” with a list of trackers which you want to be blocked.
My current file contains:
9.rarbg.com
announce.torrentsmd.com
bigfoot1942.sektori.org
bt.careland.com.cn
bttrack.9you.com
bttracker.crunchbanglinux.org
coppersurfer.tk
explodie.org
i.bandito.org
mgtracker.org
open.demonii.com
opensharing.org
torrent.fedoraproject.org
torrent.gresille.org
tracker.best-torrents.net
tracker.blucds.com
tracker.btzoo.eu
tracker.coppersurfer.tk
tracker.dler.org
tracker.istole.it
tracker.leechers-paradise.org
tracker.nwps.ws
tracker.openbittorrent.com
tracker.publicbt.com
tracker.tfile.me
tracker1.wasabii.com.tw
You can have duplicates in the list, script will take care of that.
Now create “/usr/bin/blocktrackers” script:
#!/bin/bash

IFS=$'\n'
L=$(/usr/bin/sort /etc/trackers | /usr/bin/uniq)
for fn in $L; do
        /sbin/iptables -D INPUT -d $fn -j DROP -m comment --comment "Tracker"
        /sbin/iptables -D FORWARD -d $fn -j DROP -m comment --comment "Tracker"
        /sbin/iptables -D OUTPUT -d $fn -j DROP -m comment --comment "Tracker"
        /sbin/iptables -A INPUT -d $fn -j DROP -m comment --comment "Tracker"
        /sbin/iptables -A FORWARD -d $fn -j DROP -m comment --comment "Tracker"
        /sbin/iptables -A OUTPUT -d $fn -j DROP -m comment --comment "Tracker"
done
Make it executable and create a cronjob to run it daily because trackers change IP address very often.
It is a very good security practice to completely disable password authentication on your Linux server and use public key authentication method.
In order to do that you need to create your own public/private key pair and put the public key in ~/.ssh/authorized_keys
mkdir -p ~/.ssh
echo 'ssh-rsa AAAAB3NzaC1yc2EAAAADAQABAAABAQDHV80zPWjPAwKo8Be0k1ypBRMdYDC0H2eQchu3MFsEp8av2F/18GNuHsbyMWp0p1uovP5LGZ/oPZ1ISJxLxxOBiqv0fOyb8uTDYWUUITgGvq9Fppj3BNYTjnLCUAVMKdP3VJ7IPk69ygYR1nhAXiv3dSfeG74f2eo3ZYhrylsVS2G84DUh47FuEFOsfn5s2wXVjwAgqdKBhiVQZWrptf6TEK3fZTVg4rCiRJ+YiIwTZr/CfFHbdqOiwDlGR5fWo0PHHq31lrQXzkASfi3C+ahQFnHsy4+8LdCq+TjzC3J6PbuXP1wpLdm1iP35f61hU1wX2hwhyxdvE+SBXT/PpSVB' >> ~/.ssh/authorized_keys
DISCLAIMER : The above key is my public key, if you put it on your server, I will be able to login into your server 😀
Now add/change the following config to the BEGINNING of /etc/ssh/sshd_config
ChallengeResponseAuthentication no
PasswordAuthentication no
UsePAM no
PubkeyAuthentication yes
and restart ssh service :
service ssh restart
In order to check that only public key authentication is available run the following command on the server :
ssh -o PreferredAuthentications=none -o NoHostAuthenticationForLocalhost=yes localhost -p 22
and you should get this error :
Permission denied (publickey).
Note : Before closing your current SSH session, I highly recommend you to test that actually you can login into your server by new method. otherwise you may be locked out of your server.
As I have received several requests from Iranian readers of my blog, I have done some analysis on recent DigiNotar security breach and MITM attack to Iranian users.
This analysis is based on Fox-IT interim report of breach. You can download the complete report in PDF Format from the following link :
http://www.adminsehow.com/wp-content/uploads/2011/09/rapport-fox-it-operation-black-tulip-v1-0.pdf
What is MITM attack and how to prevent it ?
MITM stands for Man-In-The-Middle. it simply means someone stands between you and destination and intercepts or modifies your communication. it is quite easy when communication is not encrypted.
SSL protocol is originally invented to address this issue. The idea is that a trusted Authority (CA) authenticates the identity of destination and by using some cryptography protocols your connection to authentic destination becomes encrypted and impossible to intercept or modify.
It has been shown that the cryptography methods like AES or RC4 which are employed to encrypt the data are quite effective and very hard to crack. so the easier solution is to attack the base of trust model, the trusted authorities (CA). In this kind of attacks, hackers break into CA systems and forge valid certificates for themselves so they can impersonate themselves as authentic destinations and intercept the data. this kind of attack is used in both recent incidents, Commodo and DigiNotar.
Although the protocol is almost safe itself, unfortunately many of these CAs are vulnerable themselves making the whole process vulnerable.
The FOX-IT report indicates the DigiNotar systems were using Windows (Which is vulnerable in nature) and passwords has been crackable through brute-force attack. (More on this later)
To understand it better, I have created a diagram of recent MITM attack to Iranian users with the goal of intercepting communications between them and Google. the attackers have been able to gain access to Google accounts of users through this attack :
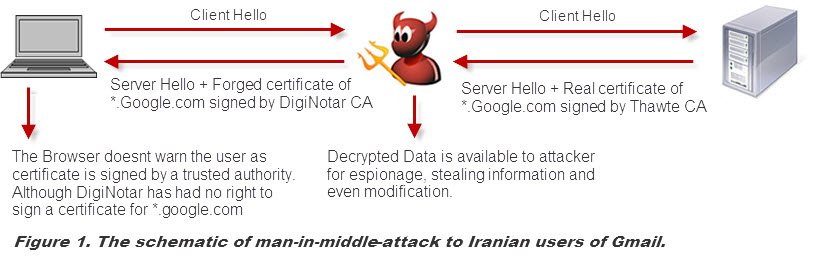
This diagram is self-explanatory. The attacker in middle impersonates itself as Google and establishes a secure connection to the user which is signed by DigiNotar CA. Although the connection is still secure, but users have a secure connection to the attacker, not real Google. so attacker has access to all information sent by user, including username, passwords, cookies and etc.
(more…)
After my previous article which explained how to backup MySQL DBs to an email address , I am going to provide a more perfect solution in this article 🙂
The previous solution had some drawbacks and some advantages but the biggest problem was about the size of backup. although we compress the data with bzip2 algorithm which provides a high level of compression but in many cases, the attachment size will exceed 25MB or the limit of your email box. so it can not be used with public email services or will need a personal email server.
a better solution is to backup the data to a remote FTP server. in this case we will have almost no limit on file size (depending on your remote FTP server).
A perfect place to backup your files is fileserve.com , it offers 500GB of space for free and FTP access to it ! it is awesome ! I would recommend to upgrade to their premium service.
click on this link to signup for your free account : FileServe.com Free Account
also we will employ encryption to make sure our data is safe in transmit and in remote location.
to use this solution make sure bzip2, mcrypt and ncftp are installed on your server. I am not going into the details of installing each package, Google is your friend 🙂
so lets say you want to backup /var/www folder, use the following command :
tar jcf - /var/www | mcrypt -k 'SOME_LONG_COMPLEX_KEY' | ncftpput -c -u FTP_USER -p FTP_PASS FTP_HOST /PREFIX-`date +%Y%m%d`
this only command will compress the whole /var/www folder by tar and bzip2 at the same time encrypt it by your key and at the same time will upload it to remote FTP server !
omg ! thats why I love Linux ! you can put it in your crontab to create automatic backups.
now lets say you want to backup all MySQL DBs , you can use the following command :
mysqldump --user=USERNAME --password=PASSWORD -A | bzip2 | mcrypt -k 'SOME_LONG_COMPLEX_KEY' | ncftpput -c -u FTP_USER -p FTP_PASS FTP_HOST /PREFIX-`date +%Y%m%d`
the combinations and possibilities are limitless !
I just gave you the idea and showed you the power, use your own brain to make your perfect solution 😉
Just something else , if you needed to decrypt the file , you can use the following command :
mcrypt -d FILE_NAME -k 'YOUR_LONG_COMPLEX_KEY' > NEW_FILE_NAME
The following script will block and log un-encrypted BitTorrent & DHT traffic on your Linux firewall.
I have personally tested it on debian 5 lenny , but I am almost sure it should work pretty well on any new Linux distros.
iptables -N LOGDROP > /dev/null 2> /dev/null
iptables -F LOGDROP
iptables -A LOGDROP -j LOG --log-prefix "LOGDROP "
iptables -A LOGDROP -j DROP

#Torrent
iptables -A FORWARD -m string --algo bm --string "BitTorrent" -j LOGDROP
iptables -A FORWARD -m string --algo bm --string "BitTorrent protocol" -j LOGDROP
iptables -A FORWARD -m string --algo bm --string "peer_id=" -j LOGDROP
iptables -A FORWARD -m string --algo bm --string ".torrent" -j LOGDROP
iptables -A FORWARD -m string --algo bm --string "announce.php?passkey=" -j LOGDROP
iptables -A FORWARD -m string --algo bm --string "torrent" -j LOGDROP
iptables -A FORWARD -m string --algo bm --string "announce" -j LOGDROP
iptables -A FORWARD -m string --algo bm --string "info_hash" -j LOGDROP

# DHT keyword
iptables -A FORWARD -m string --string "get_peers" --algo bm -j LOGDROP
iptables -A FORWARD -m string --string "announce_peer" --algo bm -j LOGDROP
iptables -A FORWARD -m string --string "find_node" --algo bm -j LOGDROP
I was following up the news regarding the recent attacks to Comodo and gaining access to their cert signing system. Today I found out he has posted some comments regarding his attack and claimed some nonsense , so I decided to write a response to him , here it goes :
First of all you have claimed you are only a 21 years kid , are you kidding ? the aim of the attack has been to create certs signed by Comodo CAs for mail.google.com and login.yahoo.com and etc which can only be used to do man-in-middle type of attack. in fact if you do not have access to internet infrastructure in Iran , these certs have no use ! why would a 21 years old kid want to do that ? if you are interested in some signed certs which can not be used anywhere , next time send an email to me , I will sign some certs myself and send it back to you 🙂 it is very clear that this attack has been done with cooperation of Iran’s government and Iranian revolutionary guards and their cyber army who have access to Iran’s IT infrastructure.
Second I agree what you have done is impressive. it shows your budget and the size of your criminal organization to find security holes in internet. but you have not compromised anything fundamental or serious on internet ! do you think the same trick which you use on Iranian people ( I mean bragging about your power ) will work on the world either ? in fact when I was 21 I could do better than you ( your whole criminal organization ). lol , I can send you some proofs if you like.
because you have signed fake certs for yahoo and google, many people think you have hacked their systems and compromised their security ! but pro people know it has nothing to do with google or yahoo or the security of their systems. everything is intact and secure.
The only companies who should be blamed are Comodo and their Italian partner because of weak security system and I am sure they are already in a lot of trouble by authorities 🙂
Third you talk about breaking RSA 2048 keys and so on , it just makes me laugh. you can not even break the security of RSA 16 bit ! lol
If you had the power to do that , there were no need to generate fake certs from Comodo , you generated these fake certs because you can not decrypt the SSL traffic in Iran ! you need fake signed certs to do man-in-middle attack. it itself shows how weak you are. so come on , do not brag about your power. we all know thats a big lie.
Fourth lets assume you gain access to Comodo root CAs so you can sign the certs yourself , I dont think there is any bigger achievement for you ! you know what happens ? in less than 24 hours all major browsers will update their software and revoke the certificate. as simple as that. so I recommend you to waste your time on better solutions.
Fifth I would like to thank you guys for doing this personally , what you did had no gains for you and showed your real face to the world. I am not going to get political on this post 🙂 but it had a lot of benefits to the security of the internet. I am sure authorities are already working on implementing more secure and safe procedures to generate certificates and check for revoked certs. Thank You.
And at last I would like to talk to Iranian people , they are just trying to frighten you. they have not compromised anything serious on internet. this attack shows they have nothing in hand. these fake certs CAN NOT be used the decrypt SSL traffic. always use VPN encrypted connections and for emails use SSL connections , Gmail is the best. also always use the latest versions of Google Chrome and Firefox for browsing the web. NEVER USE INTERNET EXPLORER ! not even version 9. and you will be safe 🙂
Here is the link to hacker speech : http://pastebin.com/74KXCaEZ
Powered by WordPress

Disable WordPress Commenting System to prevent spam
It is a few days that I have installed Disqus wordpress plugin and I am quite impressed by it. I am receiving no more spam/bot messages through Disqus commenting system , but still bots are able to send spam to wordpress own commenting system ! so I was looking for a solution to disable wordpress comments and I found the following link :
http://beta.beantin.se/wordpress-comment-spam-disqus/
it provides 2 solutions to get rid of wordpress commenting system , but I prefer the neat one ! delete the whole thing ! lol
simply delete wp-comments-post.php from your wordpress root installation folder. then bots can go to hell 😉